Tire Size Calculator
Tire Size Calculator
Enter tire size (e.g., 265-70R17):
Calculator Size Tools of Tire Size Calculator
How to use Tire Size Calculator tools?
Follow these step-by-step instructions to get the information you need:
1.Locate Your Current Tire Size:
Check the sidewall of your current tires to find the size printed on them. It will look something like this: 265-70R17. This number includes the tire width, aspect ratio, and rim diameter.
2.Input Your Current Tire Size:
In the calculator, enter the following details:
Width: The first number (e.g., 265).
Aspect Ratio: The second number (e.g., 70).
Rim Diameter: The last number (e.g., 17).
3.Click "Tire Size Calculate"
Once you've entered your tire size, click the button to calculate. This will process your input and display the recommended tire sizes.
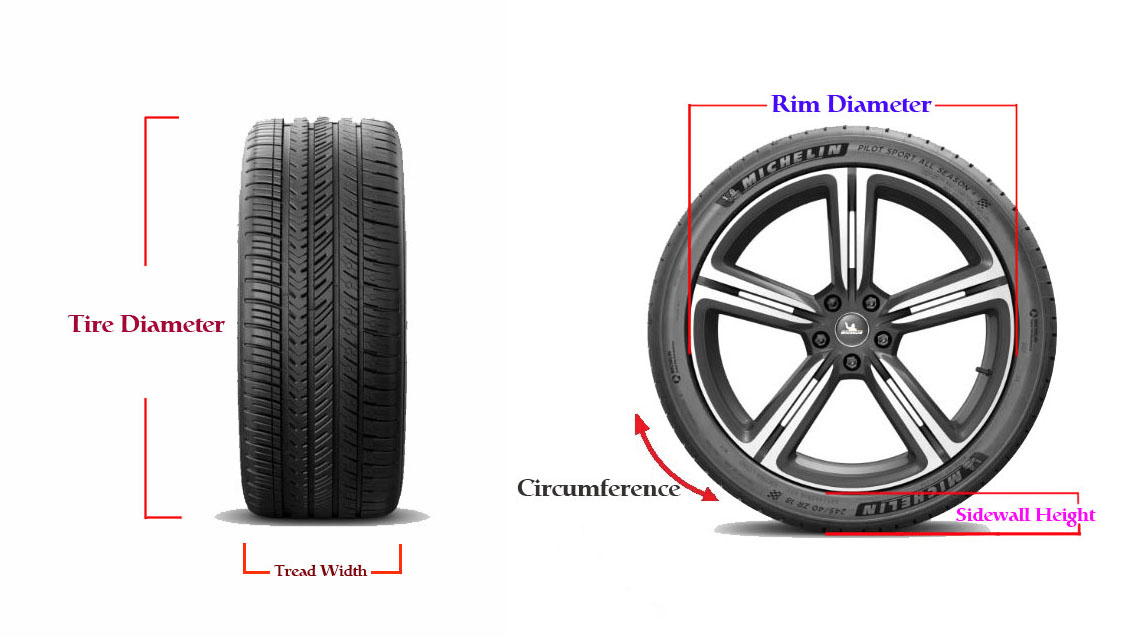
What do the numbers in a tire size mean?
For example, in a tire size 265-70R17:
- 265 is the width of the tire in millimeters
- 70 is the aspect ratio (height of the tire's cross-section to its width)
- R means it's a radial tire
- 17 is the wheel diameter in inches
Why is tire size important?
Tire size affects your vehicle's performance, fuel efficiency, and safety. The right size ensures proper fit and function.
How does changing tire size affect my vehicle?
Changing tire size can impact your speedometer accuracy, ground clearance, and overall driving characteristics. For instance, moving from a smaller size to 265-70R17 might increase your vehicle's ground clearance and alter its handling. Always consult your vehicle's manual or a professional before changing tire sizes.
What is the significance of revolutions per mile?
Revolutions per mile indicates how many times a tire rotates in one mile. This affects your vehicle's gearing, speedometer reading, and overall performance. A 265-70R17 tire will typically have fewer revolutions per mile compared to smaller sizes, which can affect your speedometer reading if not properly calibrated.
More Information about Tire Size
Aspect Ratio
Definition: The aspect ratio is the ratio of the tire's height to its width, expressed as a percentage. For example, in the tire size 265-70R17, the "70" indicates that the height of the tire is 70% of its width (265 mm).
Impact: A lower aspect ratio (e.g., 50) generally indicates a shorter sidewall, which can improve handling and stability at high speeds. However, it may result in a harsher ride over bumps. A higher aspect ratio (e.g., 70) offers more cushioning and comfort but may compromise handling slightly.
Aspect Ratio Comparison Table
| Aspect Ratio | Sidewall Height | Characteristics |
|---|---|---|
| 30-50 | Low Profile | Better handling, less comfortable ride, more susceptible to rim damage |
| 55-65 | Mid Profile | Balance between handling and comfort |
| 70-80 | High Profile | More comfortable ride, better for off-road, slightly less responsive handling |
Load Index / Load Chart
Definition: The load index indicates the maximum weight a tire can support when properly inflated. It is often found next to the tire size on the sidewall.
Impact: Choosing a tire with an appropriate load index is crucial for safety and performance. Using a tire with a lower load index than required can lead to tire failure or decreased handling.
Load Index Table (1-150) / Load Chart Table (1-150)
| Load Index | Max Load (kg) | Max Load (lbs) | Load Index | Max Load (kg) | Max Load (lbs) | Load Index | Max Load (kg) | Max Load (lbs) |
|---|---|---|---|---|---|---|---|---|
| 1 | 46 | 102 | 51 | 195 | 431 | 101 | 824 | 1816 |
| 2 | 48 | 105 | 52 | 201 | 443 | 102 | 848 | 1869 |
| 3 | 49 | 108 | 53 | 207 | 456 | 103 | 872 | 1923 |
| 4 | 50 | 111 | 54 | 213 | 469 | 104 | 898 | 1979 |
| 5 | 52 | 115 | 55 | 219 | 483 | 105 | 924 | 2037 |
| 6 | 53 | 118 | 56 | 226 | 497 | 106 | 951 | 2097 |
| 7 | 55 | 121 | 57 | 232 | 512 | 107 | 979 | 2158 |
| 8 | 57 | 125 | 58 | 239 | 527 | 108 | 1007 | 2221 |
| 9 | 58 | 129 | 59 | 246 | 542 | 109 | 1037 | 2286 |
| 10 | 60 | 132 | 60 | 253 | 558 | 110 | 1067 | 2352 |
| 11 | 62 | 136 | 61 | 260 | 574 | 111 | 1098 | 2421 |
| 12 | 64 | 140 | 62 | 268 | 591 | 112 | 1130 | 2492 |
| 13 | 65 | 144 | 63 | 276 | 608 | 113 | 1163 | 2565 |
| 14 | 67 | 148 | 64 | 284 | 626 | 114 | 1197 | 2639 |
| 15 | 69 | 153 | 65 | 292 | 644 | 115 | 1232 | 2717 |
| 16 | 71 | 157 | 66 | 301 | 663 | 116 | 1268 | 2796 |
| 17 | 73 | 162 | 67 | 310 | 682 | 117 | 1305 | 2878 |
| 18 | 76 | 167 | 68 | 319 | 702 | 118 | 1343 | 2962 |
| 19 | 78 | 171 | 69 | 328 | 723 | 119 | 1383 | 3048 |
| 20 | 80 | 176 | 70 | 337 | 744 | 120 | 1423 | 3137 |
| 21 | 82 | 182 | 71 | 347 | 766 | 121 | 1464 | 3229 |
| 22 | 85 | 187 | 72 | 357 | 788 | 122 | 1507 | 3323 |
| 23 | 87 | 192 | 73 | 368 | 811 | 123 | 1551 | 3420 |
| 24 | 90 | 198 | 74 | 379 | 835 | 124 | 1597 | 3520 |
| 25 | 92 | 204 | 75 | 390 | 859 | 125 | 1643 | 3623 |
| 26 | 95 | 210 | 76 | 401 | 884 | 126 | 1691 | 3728 |
| 27 | 98 | 216 | 77 | 413 | 910 | 127 | 1741 | 3837 |
| 28 | 101 | 222 | 78 | 425 | 937 | 128 | 1791 | 3949 |
| 29 | 104 | 229 | 79 | 437 | 964 | 129 | 1844 | 4065 |
| 30 | 107 | 235 | 80 | 450 | 992 | 130 | 1898 | 4183 |
| 31 | 110 | 242 | 81 | 463 | 1021 | 131 | 1953 | 4305 |
| 32 | 113 | 249 | 82 | 477 | 1051 | 132 | 2010 | 4431 |
| 33 | 116 | 256 | 83 | 491 | 1082 | 133 | 2069 | 4561 |
| 34 | 120 | 264 | 84 | 505 | 1113 | 134 | 2129 | 4694 |
| 35 | 123 | 272 | 85 | 520 | 1146 | 135 | 2191 | 4831 |
| 36 | 127 | 280 | 86 | 535 | 1179 | 136 | 2255 | 4972 |
| 37 | 131 | 288 | 87 | 550 | 1213 | 137 | 2321 | 5117 |
| 38 | 134 | 296 | 88 | 566 | 1249 | 138 | 2389 | 5266 |
| 39 | 138 | 305 | 89 | 583 | 1285 | 139 | 2459 | 5420 |
| 40 | 142 | 314 | 90 | 600 | 1323 | 140 | 2530 | 5578 |
| 41 | 146 | 323 | 91 | 618 | 1362 | 141 | 2604 | 5741 |
| 42 | 151 | 332 | 92 | 636 | 1401 | 142 | 2680 | 5909 |
| 43 | 155 | 342 | 93 | 654 | 1442 | 143 | 2759 | 6082 |
| 44 | 160 | 352 | 94 | 673 | 1484 | 144 | 2839 | 6259 |
| 45 | 164 | 362 | 95 | 693 | 1528 | 145 | 2922 | 6442 |
| 46 | 169 | 373 | 96 | 713 | 1572 | 146 | 3007 | 6630 |
| 47 | 174 | 384 | 97 | 734 | 1618 | 147 | 3095 | 6824 |
| 48 | 179 | 395 | 98 | 755 | 1665 | 148 | 3186 | 7023 |
| 49 | 184 | 406 | 99 | 777 | 1714 | 149 | 3279 | 7228 |
| 50 | 190 | 418 | 100 | 800 | 1764 | 150 | 3374 | 7439 |
Note: This table shows load indexes from 1 to 150. The load capacity increases by approximately 2.92% for each increment in the load index.
Speed Rating
Definition: The speed rating is a letter that indicates the maximum speed a tire can safely maintain over time. Common ratings include P (up to 93 mph), Q (up to 99 mph), and Z (over 149 mph).
Impact: Selecting a tire with a suitable speed rating is essential for safe driving, especially if you drive at higher speeds. Using a tire with a lower rating than your vehicle's capabilities can increase the risk of blowouts.
Speed Rating Table
| Speed Symbol | Max Speed (km/h) | Max Speed (mph) |
|---|---|---|
| L | 120 | 75 |
| M | 130 | 81 |
| N | 140 | 87 |
| P | 150 | 93 |
| Q | 160 | 99 |
| R | 170 | 106 |
| S | 180 | 112 |
| T | 190 | 118 |
| U | 200 | 124 |
| H | 210 | 130 |
| V | 240 | 149 |
| W | 270 | 168 |
| Y | 300 | 186 |
| (Y) | 300+ | 186+ |
Note: '(Y)' indicates speeds over 300 km/h (186 mph) where the exact maximum speed should be specified by the tire manufacturer.
Considerations When Changing Tire/Wheel Size
Changing tire or wheel size can be motivated by various factors, often including aesthetic preferences. However, it's crucial to take several considerations into account to avoid potential negative consequences, such as increased wear on the vehicle's suspension and brake components (especially anti-lock brakes), which can affect handling and lead to other mechanical issues, including those with the transmission.
1. Compatibility of Tire and Rim Sizes
Different tire sizes can fit the same rim, provided the center diameter matches. A common modification is increasing rim size. When doing so, it's essential to adjust the tire size accordingly; larger rims typically require thinner tires to ensure they fit within the vehicle's wheel well. It is generally recommended that new tires have a diameter within 3% of the factory-recommended tires to maintain performance and safety.
2. Reasons for Changing Tires
Apart from aesthetic upgrades, tires are often replaced due to blowouts or general wear and tear. Ideally, all tires should be changed simultaneously. If that's not feasible, at least replace the front or rear tires together, depending on which tire needs replacing. If only one or a few tires are changed, it's crucial to use the same type and brand to avoid issues like loss of control, inaccurate speedometer readings, or damage to the vehicle's stability system.
3. Impact on Speedometer and Odometer
Changing tire sizes affects the accuracy of the speedometer and odometer, which are calibrated based on the original tire specifications. Larger tires increase the overall circumference, leading to lower speedometer and odometer readings than the actual speed and distance traveled. Conversely, smaller tires may result in higher readings. This discrepancy can lead to potential legal issues and affect driving safety.
While it's possible to safely change tire and wheel sizes, doing so requires careful consideration of compatibility, performance implications, and how it affects vehicle systems. It is always good to consult a professional.